Forum Replies Created
-
AuthorPosts
-
November 16 / 2020 Still in quarantine. Can you believe this &#!t?
This post has received 1 vote up.If you are having problems with the DIY keg box cooling, here are a few tips…
How often are you opening the door?
Every time the door is open, you slow down the cooling process.Does your fridge have a freezer plate? how cold is that getting?
Your target low temp is 36F. Upper low is 44.Are you measuring the temp using a wired or wireless remote?
That eliminates the need to keep opening the door and slowing the cooling process.If you have a freezer plate that is below 32’F, then passing air over it will transfer heat away faster.
You can use a few scrap heat sinks from an old PC CPU to increase surface area.My freezer plate gets down to 10’F and forms frost.
If you have no frost on your freezer plate, you may have a clinker fridge.I’ll move this over to the forum.
Cheers
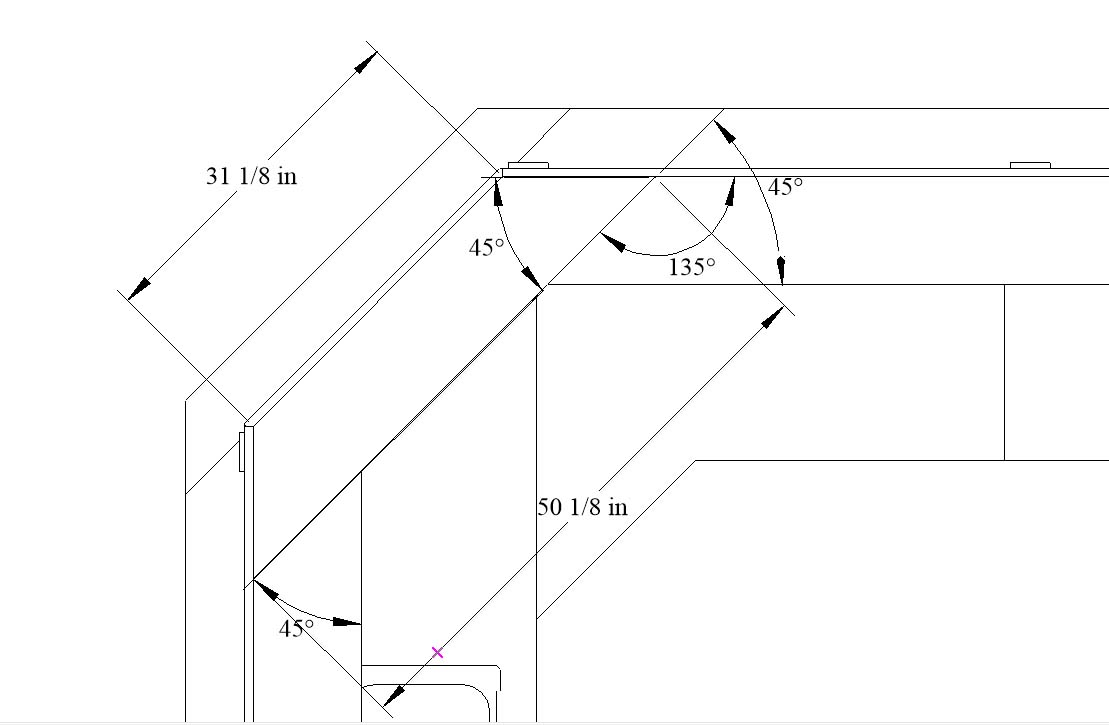
SteveDetail of the corner unit angles.
Attachments:
I’ll take a look at that…thanks
Due to another question posted today, I figured I’d include the following pic showing the finished overhang dimensions of each side. One is 6 1/2″ the other is 6 7/16″. a difference of 1/16″
Attachments:
Regarding question #1: Do not flush the back edge of part 72 with part 75. Just set the front overhang of part 75 to 6″ as shown on page 21.
If you look very closely on page 20, you do not see the edge of the base support part 72. The edge gap between 72 and 75 on the bartender side is 2.5″. The base layer overhang on the front (6″) an sides (3″) is all you need to worry about.
2.5″+9.5″+6″=18″ which is the width or the base layer sheet (part 75).Here is the reverse of the base layout…see attachment. Hope that helps a little.
Attachments:
Here’s another source for inexpensive home bar rail, Baird Brothers: https://www.bairdbrothers.com/1-34-x-5-14-Poplar-Bar-Top-Rail-B005-P1968.aspx
To save money, you can order it in random lengths then splice the sections…or order in the exact lengths you need.
All Bar Top Rails: https://www.bairdbrothers.com/Bar-Top-Rails-C29.aspxThis post has received 1 vote up.April 21, 2017 at 9:47 pm in reply to: Eliminate section C- how to finish the end of section b? #37578 Score: 1I can’t show you exactly, but I would simply add the end framing of the C section to the end of the B section. Those boards are needed for bar top support.
OR, rather than add them, just modify the end of the B section as you would have done with the standard C section. So the end upright on the B section that is part #9, would become part #48 from the C section. The rest should follow easily.This post has received 1 vote up.The CHBD is more for framing….so if you run across a sheeting error, just pull out the tape measure and adjust as needed. I have found it’s not perfect and has some strange output when making things smaller…that being parts that go to zero size….but, if that happens, it means you went so small that the part is no longer required.
For Canadian builder’s try: http://www.hardwoodsincorporated.com/product/br-475-bar-rail/
Someone mentioned that denoon does not ship to Canada… Try these guys instead: http://www.hardwoodsincorporated.com/product/br-475-bar-rail/
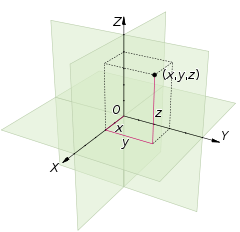
February 6, 2017 at 2:05 pm in reply to: What does WP stand for in the section part list? #37365 Score: 0The WP designations of X, Y, Z and none simply means the part is oriented along one of three axis and one null axis, named none.
Be careful using the CHBD as it can be confusing. The entire world is defined in the Cartesian coordinate system x, Y and Z. See attached drawing.
Attachments:
I think if you go to the gallery and search on “lift” or “gate” or “flapper” you might find some more examples with detail photos.
It’s really rather simple. https://www.barplan.com/galleryConsidering the height of the bar is 42″ – a 36″ high workspace counter gives you under 6″ of clearance. You can certainly do it, but you won’t fit a sink in that space. My workspace is 30″ and I’m 6’4″. Never felt too low.
-
AuthorPosts


